Tuesday, January 26, 2010

This week at Brush-Paper-Water...


All Cracked Up X
watercolor, 28" x 19"
Katharine Cartwright

One of Katharine Cartwright's paintings from this Fragility series shared a wall with my painting at the Transparent Watercolor Society of America show last summer and I was sufficiently intrigued to want to know more about her work. She has taken a subject we are familiar with -- broken eggshells -- and has manipulated them into an extended series of paintings. Playing with color and design, she explores mood and the illusion of space in these paintings, inspired by the fragility of life and the uncertain times we find ourselves in today. The series has led to another, Recession, that more explicitly ties the eggshells to our current economic crises through the use of neo-classical allegorical imagery. Katharine also has a series designed to represent the personalities of various wines through the use of still-life objects that to her convey the essential qualities of each wine. The three series are shown on her website.

Please pop over to Brush-Paper-Water to see more about Katharine and follow the link to her blog.

Sunday, January 24, 2010

Ricky Holtman...

Ricky Holtman, the artist who wrote Journaling Through Cancer, passed away on Friday, January 22. Although we never met in this life, I counted Ricky as a friend and valued his upbeat approach to his fight with cancer. He was an inspiration to all, and especially to those who have struggled with illness. The family has set up an online guest book on Ricky's website for anyone who wishes to leave a message.

Wednesday, January 20, 2010

Testing, 1, 2...


There's no denying it -- my nerdy side pops up in the blink of an eye!! While I was picking up some home repair items at the hardware store, I found something called Frogtape. Both the name and the color (a tasteful froggy green -- as it might be imagined by the makers of children's crayons) caught my eye, and then I discovered that it had been treated with (drumroll here) "Paintblock Technology" which is supposed to absorb the water from latex paints and create a seal to prevent paint from seeping under the edge of the tape. Well, if it works on painted walls, a little voice in my head reasoned, maybe it would work on watercolor paper. Enough said. Into the cart it went.

When I got home, I decided to make a proper test of it by comparing it to all the other tapes I have lurking around the studio. From left to right: frogtape, 3M-256, drafting tape, masking tape, clay board tape, delicate surface painter's tape, multi-purpose painter's tape, and tape for hard-to-stick surfaces. (You can see the tape colors in the little squares I cleaned off after painting over them.) All are 3-M except the frogtape. I stuck them on a scrap of Winsor Newton 140-lb. cold-pressed paper, burnished them down with my finger, ran a wash across them, let it dry very thoroughly, and carefully removed the tape. None seemed to harm the paper except the clay board tape, which roughed up the surface noticeably. Although it's not shown here, I then painted a stripe of bright paint down the middle of each white space and, with the exception of the clay board spot, there were no indications of damage to the surface of the paper. You can see that the painter's tapes and the extra grip stuff were most effective at keeping a clean edge. Ironically, the worst happens to be 3M-256 -- the white tape I use to seal the edges of my paintings before starting to paint!!


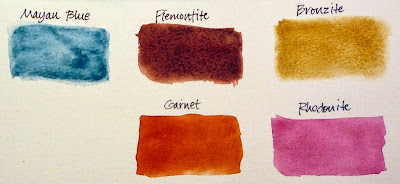
And periodically I succumb to the lure of the more exotic Daniel Smith watercolor paints. This time it was five tubes of Primatek. (I thought I was quite restrained, considering.) I tested each in several ways. What you see here is paint floated onto a pre-wetted rectangle. Although I probably won't make regular use of these, they have some interesting qualities. My favorite is Piemontite -- a very rich earthy color that separates and granulates beautifully. Bronzite has a sparkly appearance (which unfortunately doesn't photo well) as the result of its mineral structure and the sparkle holds up well in mixtures too. Rhodonite and Garnet resemble but are heavier and more opaque than Winsor Newton's Permanent Rose and Brown Madder. Mayan Blue, based on a pigment made of clay mixed with indigo dye, was a disappointment -- gummy and weak and blotchy -- and not likely one I will use in my work.

There's another installment in the masking techniques tutorial on the horizon. See you then.

Sunday, January 17, 2010

Masking fluid tutorial - part 2...


In today's tutorial, I'm going to give you some tips on removing masking fluid and next time we'll look at some of the alternate approaches to masking -- including unusual uses of the fluid and use of masking films. (If you want to review the first posts in this series, go back here and here!!)

Before removing the masking fluid, it's a good idea to clean off as much of the residual paint on the surface of the masking as possible so you don't rub dried paint onto your paper as you work. You can use a damp tissue for the larger areas and a damp cotton swab for smaller places.
In the image above, I'm removing a section of masking fluid with a rubber cement pickup -- basically a little square of crepe shoe sole material. I rub it lightly at the edge of the masked area to grab the masking and pull gently away from the paper. This works especially well with Winsor Newton masking fluid because it forms a relatively thin film. With the heavier masking fluids such as Incredible White Mask and Pebeo, you can start lifting the film with the pickup and then pull on it with your fingers to remove it in strips or sheets (this also works with the Winsor Newton). Below, you see me pulling the masking off by hand after getting each row started with the pickup tool. I carefully grab the rolled edge left by the pickup and tug gently.


If you have very small areas of masking fluid, such as the dots I used on this painting, you can either rub over them gently with the pickup tool or use your fingers to loosen them. You must clean the edge of the pickup or wipe your fingers frequently so you don't smear paint onto the newly uncovered areas as you work. I find it helps greatly to brush the surface afterwards with a drafting brush to remove all the loose bits. That won't mar your paint surface or rub paint into the reserved areas.


At the end of this process, you need to "pat down" the painting to make sure you've removed all the masking fluid. Run your hands lightly across the surface to detect any missed spots.

In my last tutorial, I mentioned that I had read that you shouldn't shake the bottle of masking fluid because it causes the latex to clump, but I couldn't recall where I'd found that information. Reader Kristen Colebank pointed out that Elizabeth Kincaid discusses this in her book Paint Watercolors that Dance with Light (North Light Books). Although I only recently purchased a copy of Elizabeth's book, I suspect that I may have looked through it at some point and that it was the source I remembered. Thanks, Kristen!!

I hope you're enjoying these posts. I recently saw a comment from an artist asking why we artists spend so much time on technique instead of talking about ideas. I've been thinking about that ever since and have to answer that without a solid grounding in technique, all the fabulous ideas in the world are just elusive mists. The goal is to reach a point where the technique becomes so integrated into your process that it becomes second nature. I hope I'm helping you proceed in that direction!!

Tuesday, January 12, 2010

This week at Brush-Paper-Water...


Celebration of Light
watercolor, 21" x 22"
Jane Freeman

Jane Freeman and I have walked on the same paths for several years, just not within sight of each other. Sometime last year, we began corresponding online and have developed a very nice friendship over the past months. In addition to creating a good number of astonishingly detailed watercolors every year and winning awards in many national shows, Jane has written the book A Celebration of Light (North Light Books) and has been the catalyst for several online art groups, serving as an editor at artcafe.net for five years and as a contributing editor at the worldofwatercolor.com for three years. She is also the creator and administrator of the Facebook group, Artcolony.

Please link over to Brush-Paper-Water to see more of Jane's work and take the link from there to her blog.


Monday, January 11, 2010

Featured artist...


Chilean Jasmine
watercolor, 10" x 14"
Chris Beck

I'm the featured artist this month for the Grupo de Acuarelistas Hispanoamericanos on Facebook. Please pop in for a visit if you're on Facebook. The group was formed in Caracas, Venezuela in 2003 by Consuelo Moros for the purpose of sharing all things related to watercolor. I'm grateful to her for the invitation, first to join the group and now to be the featured artist.

Chilean Jasmine (Mandevilla laxa) is a vine that, although not native to my area, will grow in sheltered garden conditions here. It has incredibly fragrant flowers -- a cross between gardenias and Easter lilies is the best description I can provide. I painted this some time ago, but the piece sold immediately and has had no public visibility. I'm so glad to be able to share it with everyone now.

Saturday, January 9, 2010

Finished in the nick of time...


Window Shopping at Midnight, 20" x 15"
transparent watercolor
Chris Beck

I worked feverishly to finish this during the past week so I could scan it and get a show entry in the mail. I took the reference photo for this several years ago but needed some time to think it through technically. And of course, many other "must-do" paintings got in the queue along the way. Once I got started, I had a great time and I'm really happy with the finished painting.

Here's a shot of the painting right after I removed all the masking. I had masked some areas at the very start, poured/brushed a warm underpainting, and then masked those areas too. I used the warm colors as a guide, but as you can see from the finished painting, they were just a rough version of the final colors. This painting involved re-masking some areas several times to protect them from subsequent paint application (check out the finished moon and star in closeup).


Hope you enjoy the painting. I'll be back with more information on masking fluid and techniques in a couple of days.

Monday, January 4, 2010

What a difference a day makes...


I went to bed last night sure that I'd lost this painting -- poured washes hadn't worked the way I expected and . . . well, let's just say "mistakes were made." I hate that feeling.

But I don't have time to start over on this, so I decided to proceed with the next pour this morning and make the best of it. This pour happily covered the problems I'd created for myself yesterday and has added some funky "special effects" -- I'm back on track!! I may do another wash over parts of the painting before I remove the masking, but I no longer have that sinking feeling that I've wasted all my efforts so far.

What you see is a tiny section of the painting, with a fair amount of residual paint on the masked areas. I'll clean that off a bit before I remove the masking, but because I used Incredible White Mask on most of the larger areas, I should be able to pull it off in sheets once I get a corner started. That largely eliminates the problem of rubbing paint off the masking and onto the open paper.

As you can see, I masked over a poured first layer of paint, rather than preserving white paper, and I will be enhancing and modifying the color as needed after I remove the masking. Stay tuned!!


I'm also planning to do another post in the next few days on variations in masking techniques. Be sure to stop by for the continuing tutorial.

Saturday, January 2, 2010

A masking fluid tutorial...


Yesterday's post on watercolor masking fluid generated a lot of interest and feedback. Lots of strong feelings out there on the subject -- particularly when it comes to the brand!! I decided this topic deserved a little more airtime.

I've been using masking fluid since I returned to watercolor 15 years ago -- starting with very experimental spattering techniques and eventually moving to controlled use to preserve whites or to allow me to create background washes around complicated shapes. Although some artists use frisket film in combination with the fluid, I have always coated all masked areas with fluid to make sure all surfaces behave the same after I remove the masking and start adding paint. I use a variety of masking fluids and tools to accomplish my goals, as you can see in the photo above.

You can see the various masking fluids I use, brushes (a size 2 and size 6 are all I need), my bucket of soapy water and the little container of liquid dish soap, the sharpened wooden handle of an old cheap brush, a toothbrush for spattering, a ruling pen, and a couple of different nibs.

Inexpensive white synthetic brushes seem to work best with masking fluid. (Whatever you do, do not use a fine watercolor brush to apply it.) Yesterday's post includes information on how I keep the brushes in good condition. Although I've never tried it, some people use Goo Gone or other solvents to rescue clogged brushes.

The supernib plus from Masquepen is in the upper left of this closeup photo, along with the fine pin they include to help clean it. At middle right is a bottle marketed by Jacquard for silk painting -- three different nibs are available and what is shown is the mid-size one. The metal nib screws onto the little plastic spout which pops into the bottle top. When I'm using this, I put the straight pin into the nib to keep it open when I take a break. These nibs seem to work best with slightly thicker-bodied fluids -- Pebeo and Incredible White Mask -- and are fairly easy to clean because of the short tip.

The ruling pen, shown at the bottom of the photo, can be adjusted to give lines of varying widths. I find the Winsor Newton fluid works best because it flows easily. A line width of about 1mm seems to be best for outlining rectilinear shapes. You can also create finer lines for special things like cat whiskers or tiny plant hairs, but it's difficult to make very thick lines because the pen doesn't hold enough fluid to go very far. This tool is very easy to clean by wiping it thoroughly and/or peeling off any dried masking. You can go here, here, or here to find ruling pens.

I got an Incredible Nib with my first purchase of Incredible White Mask, but I've never found it to be useful.

Don't buy large quantities of masking fluid unless you're planning some big projects. Pebeo tends to seize up in the bottle over time and Incredible White Mask can be difficult to remove if it's old when applied, even if you don't leave it on the paper very long. A sign that it's too old is the color -- when fresh it's the color of cream, and it gets very yellowed when old. Although I don't always remember to do this, it's a good idea to date your bottle when you buy it.

Slightly thickened masking fluid can be thinned with a very small amount of plain ammonia. I always stir the fluid rather than shaking it, after reading some years ago that shaking caused the latex particles to clump and separate out of solution, making the stuff useless. Yet several manufacturers instruct you to shake the masking fluid before using. Although I often save technical information, I can't find the article I read. If anyone has more information on this matter, please leave a comment.

Masking fluid must be applied to perfectly dry paper and your painting must also be perfectly dry before you remove the masking. You can remove it with your fingers or with a rubber cement pickup (a small square that looks like a piece of a crepe sole) if there's a large amount to remove.

After removing the mask, you'll have bright white shapes with hard edges. It's this characteristic that leads many watercolorists to reject the use of masking fluid. However, by softening the edges and/or painting in the shapes, you can integrate them and create an esthetically pleasing painting. But that's a topic for another day!!

Thank yous (current and belated)...

About a week ago, Deb Ward announced that I'd won her Holiday Giveaway, but she kept us all in suspense about my gift. Late on the afternoon of the 31st, Señor Terremoto thought to check our post office box and there was my mystery package from Deb!! I'm pleased to say that I received a set of notecards featuring six of Deb's beautiful paintings, including one of my all-time faves, the peony that graces Deb's blog banner (go check it out!!). Thank you, Deb!!

The second thank you is also to Deb, for bestowing a Kreativ Blogger award on me last October. I got so woefully behind in my blog reading while I was back in Wisconsin for my dad's memorial service that I gave up on trying to catch up and just started in where I was in late October. But that meant I completely missed Deb's award. So a very belated thank you, Deb, for your vote of support!!

Friday, January 1, 2010

Starting off the new year as a materials geek...


I finally had a chance to test the Stephen Quiller watercolors I'd received a few months ago. The primary claim of this line is that the pigments are balanced to give perfect neutrals when complements are combined (and each tube is labelled to identify its complement). Taking into account that it's difficult to mix exactly perfect proportions, my impression is that they perform as advertised. However, I found them a bit gummy to brush out -- perhaps due to the use of honey as one of the ingredients.

As a comparison, I mixed neutrals using the same Winsor Newton pigments, with one exception -- I don't have cadmium yellow on my palette so I substituted Winsor yellow, knowing that it was not likely to give a clean neutral. Although my camera distorts the color just a bit, I think you can see that the Winsor Newton neutrals are comparable to those mixed with Quiller paints. The W-N mix of ultramarine violet and Winsor yellow is muddy, as I suspected it would be. That's because Winsor yellow is a staining pigment and is not compatible with the granular ultramarine violet whereas the cadmium yellow, another non-staining pigment, mixes well with that violet.

In sum, I'm happy with the W-N colors I have on my palette -- I know which pigments can be successfully mixed and I have a wide range of pigments for that reason -- and I prefer their consistency.


I've also been trying out some new masking fluid -- Masquepen -- using the Supernib Plus for the little blue dots you see on this early-stage painting. The beauty of the superfine nib is that you can make very consistent-size dots -- these are about 2mm in diameter. It really is important to clean the nib frequently however, because it's so fine that it can clog up in a very short time. I keep a bucket of soapy water on the table and rinse the nib every few minutes, blowing the soapy water through the tip and running a fine wire through it to make sure it's completely clear. The other areas on the painting have been masked with either Incredible White Mask or Winsor Newton Colorless Masking Fluid applied with a Cheap Joes Uggly Brush -- the masking shows up as slightly darker and a bit shiny where the light hits it. I dip the brush in liquid dish soap and then rinse it slightly and wipe it before dipping into the masking fluid. I also rinse the brush regularly and repeat the soap step before applying more masking.