Before removing the masking fluid, it's a good idea to clean off as much of the residual paint on the surface of the masking as possible so you don't rub dried paint onto your paper as you work. You can use a damp tissue for the larger areas and a damp cotton swab for smaller places.
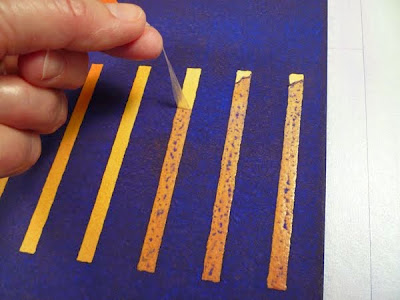
In the image above, I'm removing a section of masking fluid with a rubber cement pickup -- basically a little square of crepe shoe sole material. I rub it lightly at the edge of the masked area to grab the masking and pull gently away from the paper. This works especially well with Winsor Newton masking fluid because it forms a relatively thin film. With the heavier masking fluids such as Incredible White Mask and Pebeo, you can start lifting the film with the pickup and then pull on it with your fingers to remove it in strips or sheets (this also works with the Winsor Newton). Below, you see me pulling the masking off by hand after getting each row started with the pickup tool. I carefully grab the rolled edge left by the pickup and tug gently.

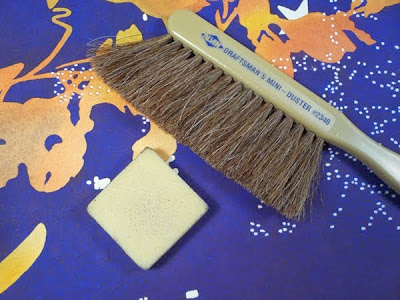
If you have very small areas of masking fluid, such as the dots I used on this painting, you can either rub over them gently with the pickup tool or use your fingers to loosen them. You must clean the edge of the pickup or wipe your fingers frequently so you don't smear paint onto the newly uncovered areas as you work. I find it helps greatly to brush the surface afterwards with a drafting brush to remove all the loose bits. That won't mar your paint surface or rub paint into the reserved areas.

At the end of this process, you need to "pat down" the painting to make sure you've removed all the masking fluid. Run your hands lightly across the surface to detect any missed spots.
In my last tutorial, I mentioned that I had read that you shouldn't shake the bottle of masking fluid because it causes the latex to clump, but I couldn't recall where I'd found that information. Reader Kristen Colebank pointed out that Elizabeth Kincaid discusses this in her book Paint Watercolors that Dance with Light (North Light Books). Although I only recently purchased a copy of Elizabeth's book, I suspect that I may have looked through it at some point and that it was the source I remembered. Thanks, Kristen!!
I hope you're enjoying these posts. I recently saw a comment from an artist asking why we artists spend so much time on technique instead of talking about ideas. I've been thinking about that ever since and have to answer that without a solid grounding in technique, all the fabulous ideas in the world are just elusive mists. The goal is to reach a point where the technique becomes so integrated into your process that it becomes second nature. I hope I'm helping you proceed in that direction!!

Thanks for this review on masking fluid...as well as the first part too. love both your blogs!!
ReplyDeleteThanks Chris for taking the time to post your tutorials. I enjoy and learn from them.
ReplyDeleteI like your commment, Chris, about technique vs ideas :) I don't think one needs help with ideas - we are constantly overrun with ideas. But, as you say, without the technique to bring those ideas to fruition, you're just someone who's full of...ideas! haha And I think blogs are an excellent way to help/teach those who don't have individual teachers or mentors close to them.
ReplyDeleteChris...another great tutorial...you have a gift for slowing down, and translating what are either the basics, what may be intuitive to some, or a whole new approach to others so that all will understand. Thanks for sharing.
ReplyDeleteThanks, Cynthia and Vicki!! Glad these are helpful.
ReplyDeleteRhonda, I'm glad to have your supportive comments -- thanks!!
Julie, thanks for the compliment!! Glad you appreciate my efforts!
Thank you for taking time to show how to do this. We have to remember that there are many beginners out there looking for tips and techniques. I agree with a solid grounding in the techniques - how can you paint if you don't know how to paint!!! I use Pebeo or Winsor Newton and never, ever shake! Just a little "twist of the wrist" is all. I call the "pat down" the "Braille Method" - i.e., I just feel over the painting for any little bits, but never thought about using a soft brush to remove it - good idea!
ReplyDeleteHey, Deb!! Love your phrases for mixing masking fluid and checking for missed bits on removal -- the words of a veteran teacher who knows how to make things memorable!! I think your students must have a lot of fun in your classes!!
ReplyDeleteExcellent post, Chris. There's something really exciting about the "unmasking" stage. As fun as 'untaping' a sheet to get that clean border. Great demo and tips. thanks.
ReplyDeleteThanks, Liz!! I agree -- both are like unwrapping a present!!
ReplyDeleteMy absolute favorite part of working with masking is taking it off and seeing the results! Fun and informative!
ReplyDeleteword verification "baciti" does that mean little kisses in Italian?
Hi Guy!! Glad you liked the post -- I think "little kisses" is "baci" -- maybe baciti is REALLY little kisses -- or AIR kisses -- yeah, that's the ticket!! ;-D
ReplyDelete